SAML/SSO
Summary
Data Control Tower (DCT) can delegate authentication to a SAML 2.0-compatible Identity Provider (IdP) to achieve Single Sign-On (SSO). An IdP—such as Active Directory Federation Services (ADFS), Azure Active Directory, PingFederate, Okta, or OneLogin—is typically managed by your IT team and centralizes account management for your organization. SSO streamlines access, improves security, and reduces onboarding friction by allowing you to sign in to multiple applications using the same credentials.
DCT's SAML/SSO implementation supports web browser-based authentication only. It does not support authentication for the API, DCT Toolkit, DevOps integrations, or other automation tools.
SAML/SSO can be configured alongside DCT’s other authentication methods, including LDAP/AD and local authentication. If all are configured with the same email-based identity, you can transition smoothly between methods as needed.
Architecture
DCT supports two SAML/SSO authentication workflows:
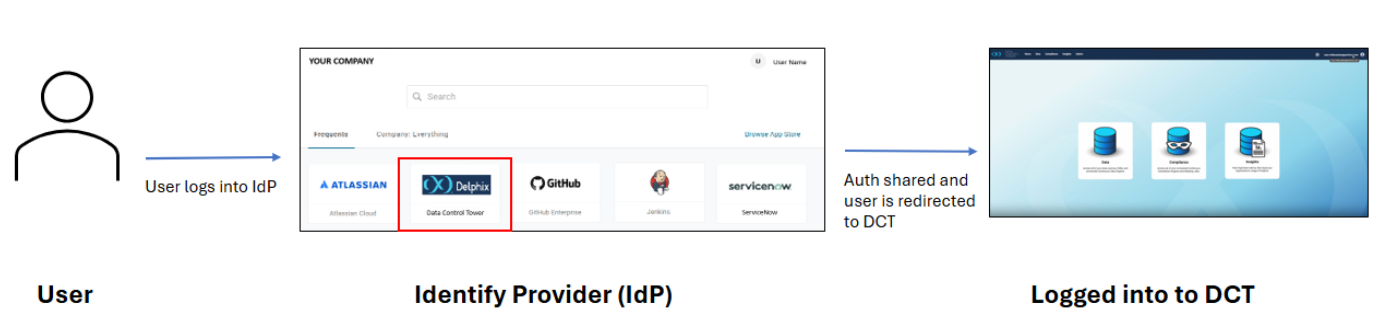
IdP-initiated
-
You begin by logging directly into your organization's IdP portal.
-
From your dashboard of available applications, select DCT.
-
The IdP automatically authenticates you and redirects you to DCT, granting access.
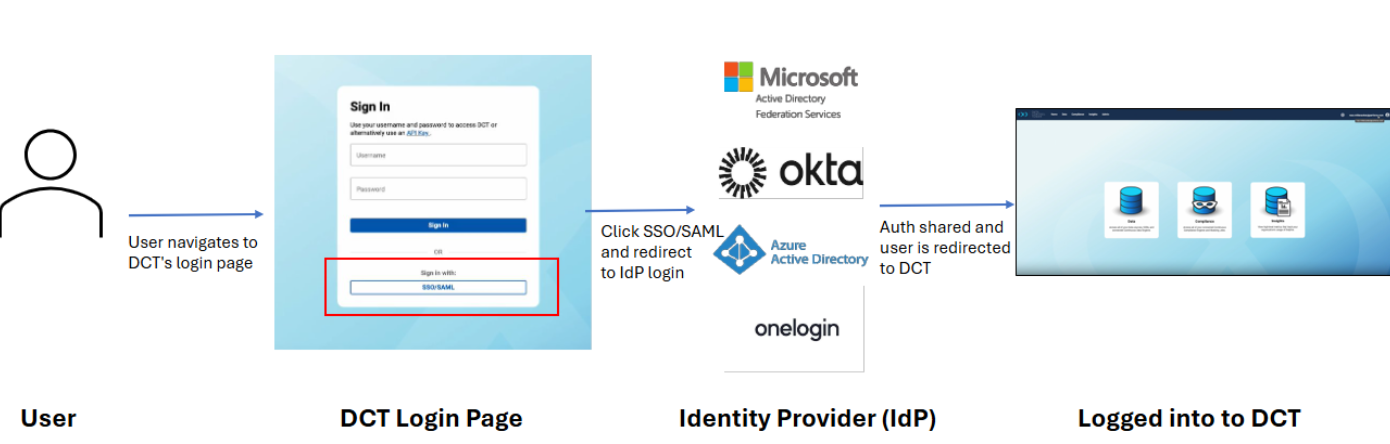
SP-initiated
-
You navigate directly to the DCT login page and select the SSO/SAML login option.
-
You are redirected to your organization’s IdP to log in.
-
Upon authentication, you are returned to DCT and granted access.
Choosing a method
Both workflows are secure and valid. Choose the one that aligns with your organization’s access patterns. Both can be enabled if needed.
Requirements
-
A SAML 2.0 WebSSO-compatible Identity Provider
-
A browser with HTTPS connectivity to connect both DCT and the IdP over port 443—DCT and the IdP do not communicate directly, all traffic flows through the browser.
-
A unique email address as the identifier. The SAML
NameIDattribute must be mapped to each account's unique email address.
Group membership mapping
DCT can retrieve group membership from your IdP during login. On each login, DCT updates the user account’s login_groups tag to reflect group membership from the IdP. If the tag matches any Access Group in DCT, you are automatically assigned the relevant permissions. This automates access control and keeps group membership in sync with your IdP.
Configuration
Configuring SAML/SSO requires changes both in your Identity Provider and within DCT. DCT administrators will often need to coordinate with the team that manages the IdP.
Please note, DCT does not sign SAML authentication requests. The Identity Provider (IdP) must sign either the SAML responses, the assertions, or both. This requirement is consistent with the SSO implementation in Delphix Continuous Data.
Identity provider (IdP) setup
Contact your IdP team and provide the following information. The exact steps may vary by IdP vendor (e.g., ADFS uses a Relying Party Trust, Okta uses an Application, etc.).
| Name | Alternate names | Suggested value/notes |
|---|---|---|
| Protocol | N/A | SAML 2.0 WebSSO |
| Binding | POST | POST binding only |
| Entity ID |
Audience URI, SP Entity ID, Relying Party trust identifier |
Typically use your DCT hostname for easy identification. This value must match in both IdP and DCT configurations. |
| Single Sing-On URL |
SAML Assertion Consumer Service (ACS), Recipient URL, Destination URL, Relying Party SAML 2.0 SSO |
|
| SP-initiated URL | N/A | Required if using the SP-initiated workflow: https://<dct-hostname>/v2/saml/login |
| NameID | N/A |
Should include the user’s unique email address. DCT will match this to the account email field during SAML authentication. Set by your IdP team in the SAML XML metadata. If you use LDAP/AD or local auth in parallel, this ensures a single account per user. |
| Attribute Mappings | N/A |
On DCT account creation, SAML can automatically set the First Name, Last Name, and Groups ( |
After configuration, your IdP team should provide:
-
Entity ID XML
-
Metadata string
-
(Optional) The required attribute mapping values for First Name, Last Name, and Groups.
DCT SAML/SSO setup
-
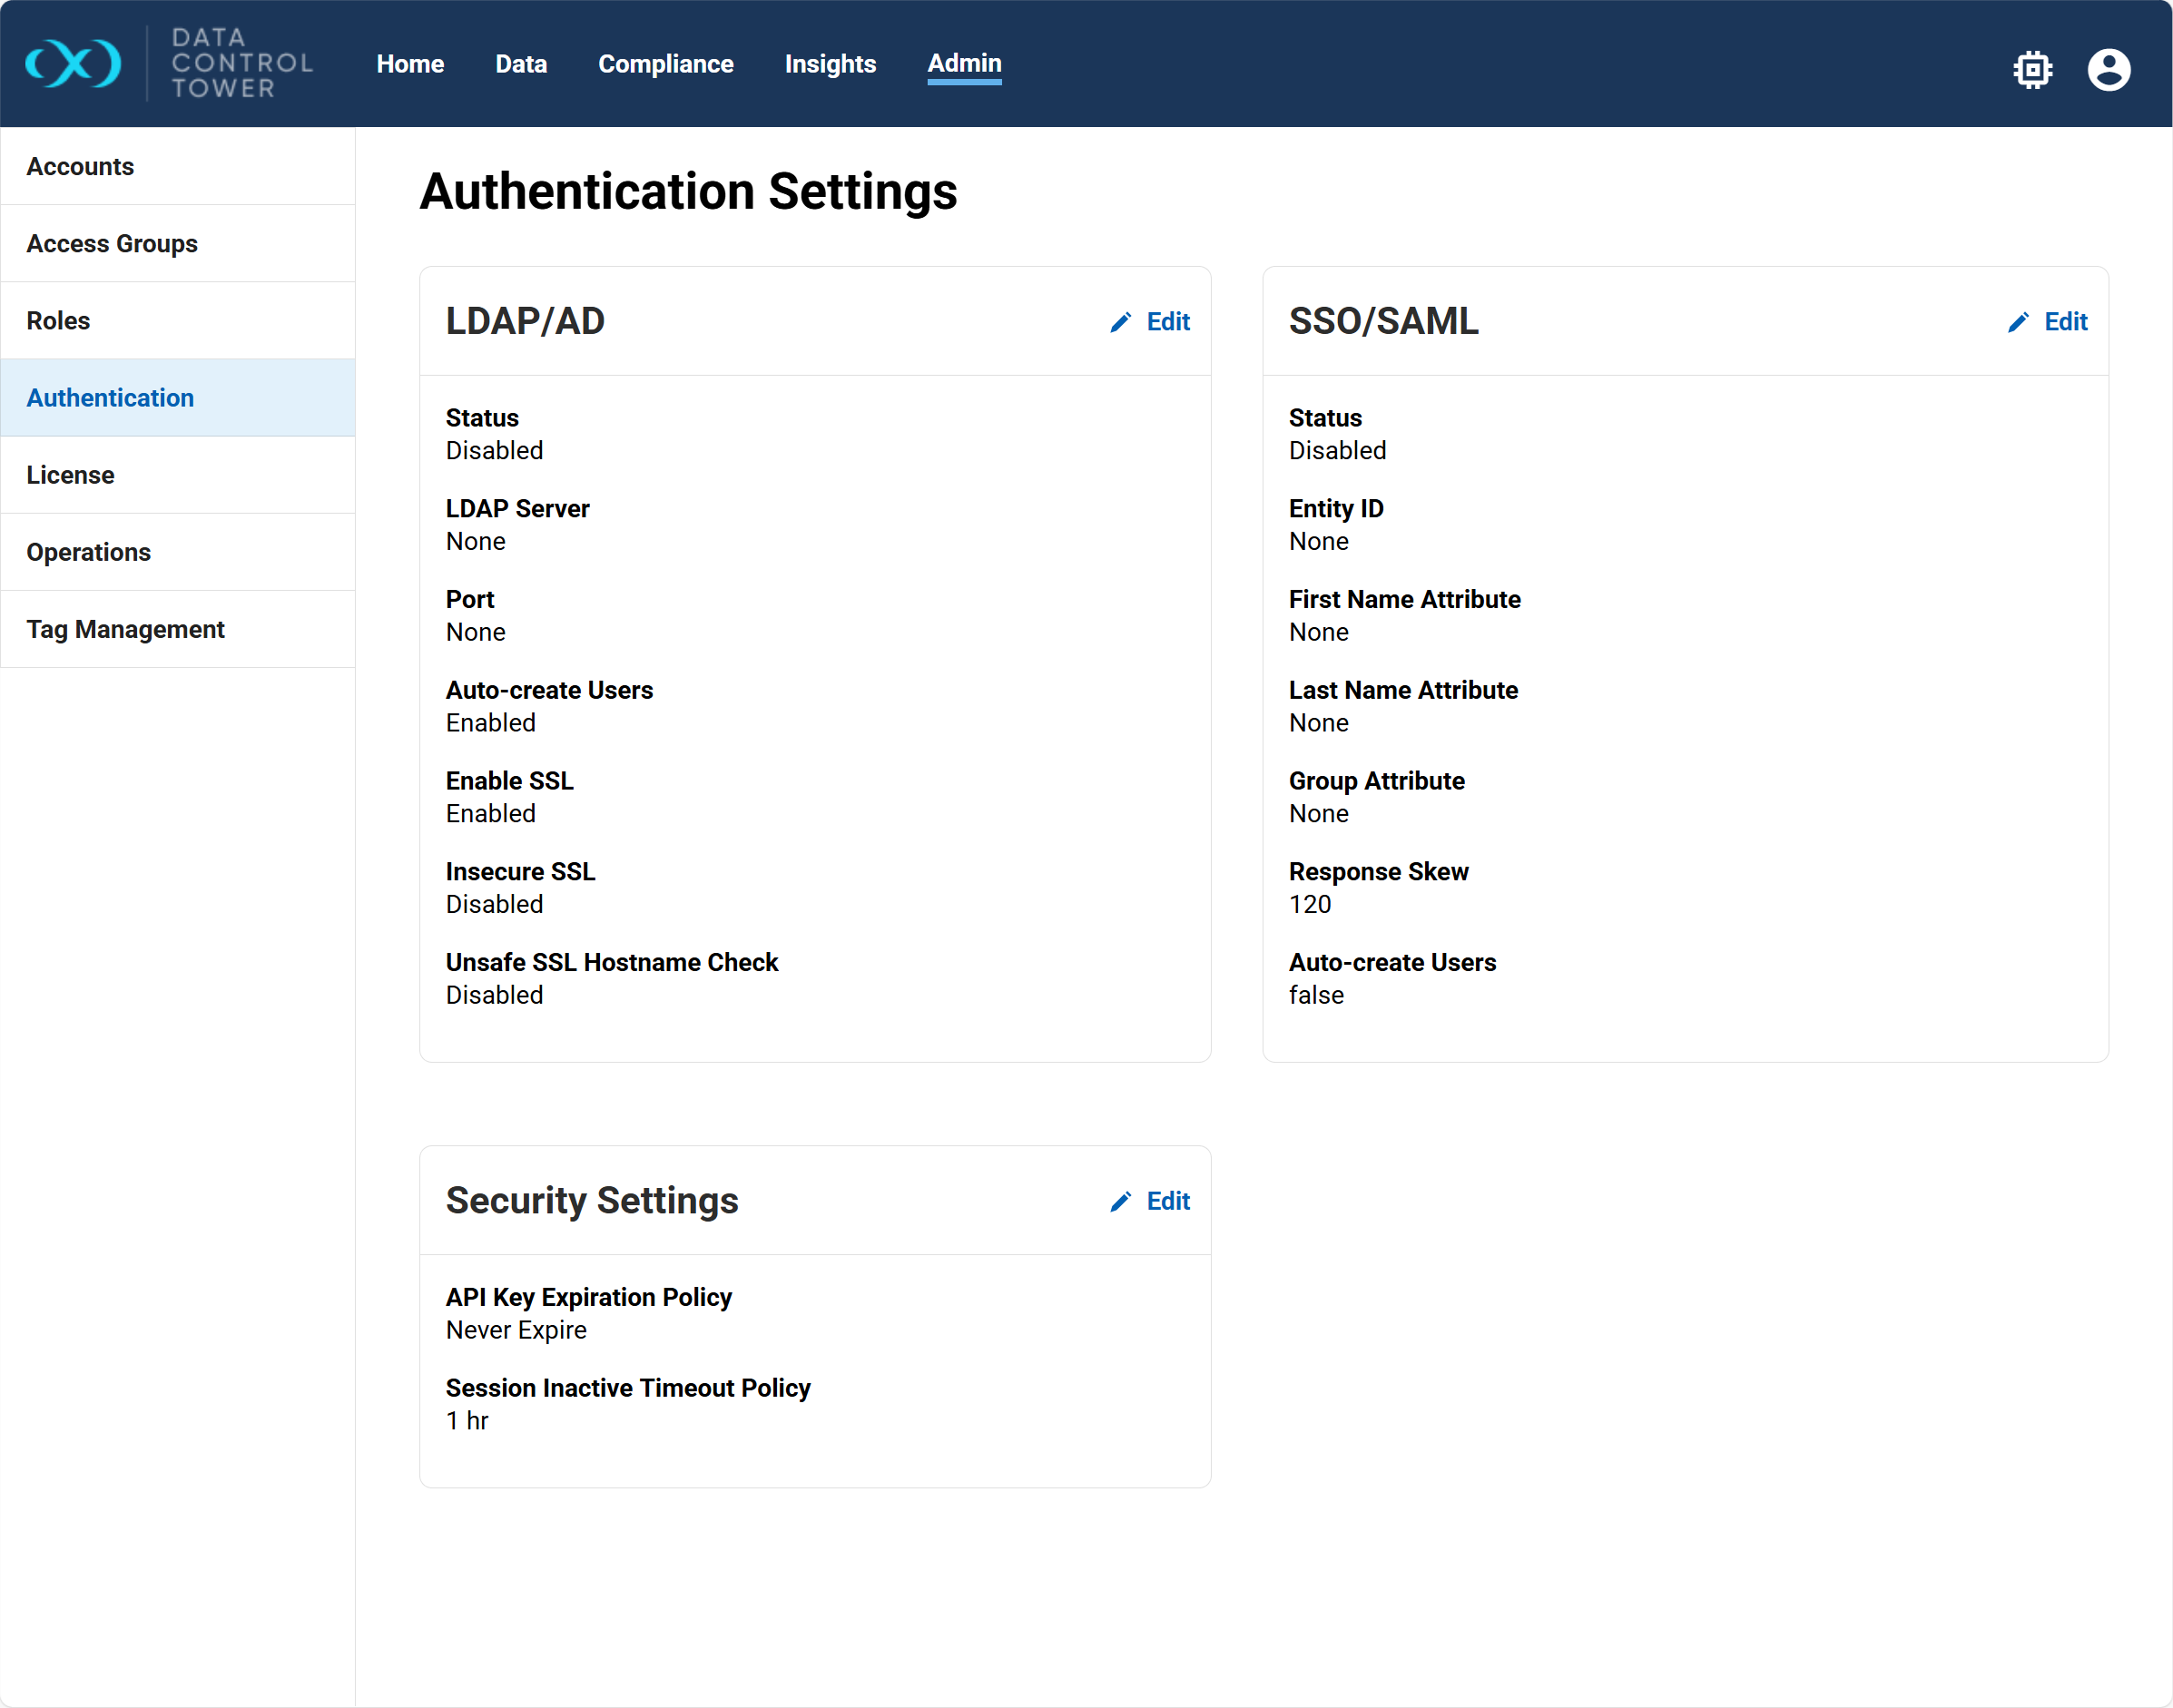
In DCT, go to Admin > Authentication.
-
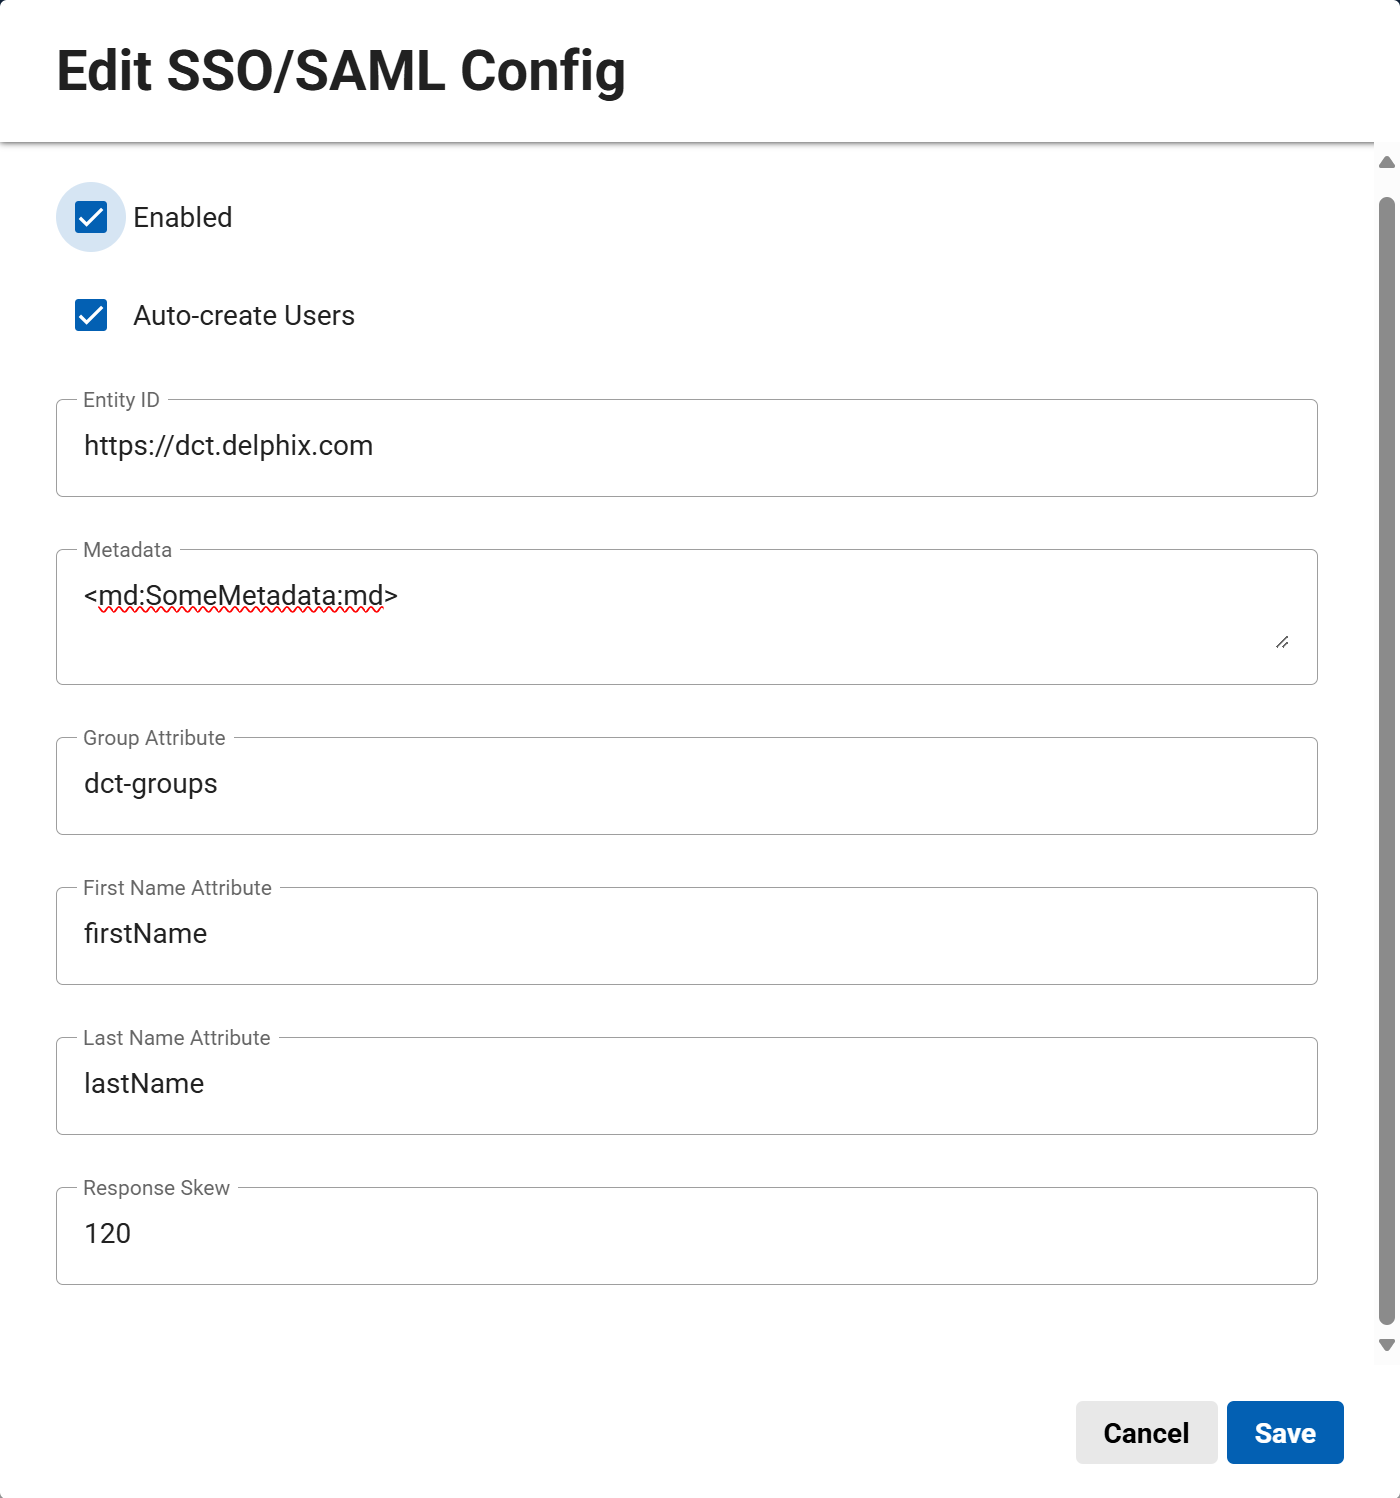
Select Edit next to SSO/SAML and configure the information in the window that appears:
-
Enabled: Turns on SSO/SAML.
-
Auto-create Users: If enabled, accounts are automatically created for authenticated users if no matching account exists. If disabled, you must pre-create accounts with matching email addresses.
-
Entity ID: Must match the value provided by your IdP.
-
Metadata: Paste the XML metadata string from your IdP team.
-
Group, First Name, Last Name Attribute (optional): If specified, these fields will be updated dynamically from IdP values on login. The group attribute enables automatic access control via Access Groups.
-
Response Skew: Maximum allowed clock difference (in seconds) between the SAML response and DCT. Default is 120 seconds.
-
-
Once saved, you can log in using SSO/SAML. Make sure your Access Groups are configured to grant access as expected.
Attributes mapping
The only required attribute in the SAML response is NameID, which must contain the user's unique email address.
If desired, you can also map attributes for First Name, Last Name, and Group membership. These values are set as properties of the DCT account. For each group, DCT creates a protected tag with key=login_groups and the group name as the value. This tag controls Access Group membership automatically.
If you are unsure which attributes to specify, ask your IdP team.
Advanced API configuration
SSO/SAML can be configured via the API’s saml-config PUT endpoint. A full list of API endpoints can be found in the API references page.
Example
url --location --request PUT 'https://<hostname>/v2/management/saml-config' \
--header 'Content-Type: application/json' \
--header 'Accept: application/json' \
--header 'Authorization: apk <your API key>' \
--data-raw '{
  "enabled": true,
  "auto_create_users": true,
  "metadata": "<json-escaped-idp-metata-xml-blob>",
  "group_attr": "<groupsValue>",
  "first_name_attr": "<firstNameValue>",
  "last_name_attr": "<lastNameValue>",
  "response_skew": 120
}' NOTE: The IDP metadata must be JSON escaped. On a terminal with jq installed, this can be achieved with the following command: jq --slurp --raw-input <<< 'xml-metadata-here'
Example API configuration with Attribute Mappings
Here is a sample SSO/SAML configuration where the First Name, Last Name, and Group Attributes are set:
curl --location --request PUT 'https://<hostname>/v2/management/saml-config' \
--header 'Content-Type: application/json' \
--header 'Accept: application/json' \
--header 'Authorization: apk <your API key>' \
--data-raw '{
  "enabled": true,
  "auto_create_users": true,
  "metadata": "<json-escaped-idp-metata-xml-blob>",
  "first_name_attr": "http://schemas.xmlsoap.org/ws/2005/05/identity/claims/givenname",
  "last_name_attr": "http://schemas.xmlsoap.org/ws/2005/05/identity/claims/surname",
  "group_attr": "http://schemas.xmlsoap.org/claims/Group"
}'
On configuration, the following sample SAML response is provided by the Identity Provider during account login:
<saml2:Assertion ...>
  ...
  <saml2:AttributeStatement>
    <saml2:Attribute Name="http://schemas.xmlsoap.org/ws/2005/05/identity/claims/givenname">
      <saml2:AttributeValue>John</saml2:AttributeValue>
    </saml2:Attribute>
    <saml2:Attribute Name="http://schemas.xmlsoap.org/ws/2005/05/identity/claims/surname">
      <saml2:AttributeValue>Doe</saml2:AttributeValue>
    </saml2:Attribute>
    <saml2:Attribute Name="http://schemas.xmlsoap.org/claims/Group">
      <saml2:AttributeValue>Dev-Team</saml2:AttributeValue>
      <saml2:AttributeValue>QA</saml2:AttributeValue>
    </saml2:Attribute>
  </saml2:AttributeStatement>
</saml2:Assertion>
DCT will then take this response and automatically create or update an account with the following properties:
{
     "id": 94,
     "username": "john.doe@company.co",
     "firstName": "John",
     "lastName": "Doe",
     "email": "john.doe@company.co",
     "tags": [
         {
             "key": "login_groups",
             "value": "Dev-Team"
         },
         {
             "key": "login_groups",
             "value": "QA"
         }
     ]
    }
Troubleshooting
I’m not sure what SSO/SAML or IdP metadata or attribute properties to specify. Can Delphix help?
-
Delphix can provide light guidance on the necessary properties. However, all attributes are highly dependent on your organization’s Identity Provider. Delphix is certified against the SAML 2.0 WebProtocol standard, but we do not have in-depth knowledge of the many implementing IdP applications. Your IdP’s managing team will be the best resource to help configure SSO/SAML.
Error Message: “There was an issue in SAML authentication: The assertion cannot be used before <timestamp>.”
-
The above error message, which is accompanied by “com.coveo.saml.SamlException: The assertion cannot be used before <timestamp>” error in the application logs, indicates that DCT was not able to validate the timestamp of the authentication provided by the Identity Provider.
This is usually due to the system clock of the machine running DCT being incorrectly configured. Consider using NTP to maintain the machine’s clock up to date.
On login or API access, our user received the following error message: “There was an error fetching data.”
-
The above error message indicates that the current account does not have permission to view the data displayed on the page. Remember that, while DCT creates accounts automatically upon login when `auto_create_users` is enabled, by default accounts are created without any authorization and thus cannot see any data. Review the section above to see how SAML/SSO group membership can be assigned automatically at account creation.