Installation and setup for OpenShift
Hardware requirements
The hardware requirements for Data Control Tower to deploy on OCP are listed below. In addition to these requirements, inbound port 443 or 80 must be open for API clients. This is the minimum total resource requirement for the deployment.
If deploying with AI features enabled, additional CPU and memory resources may be required.
-
CPU: 4-Core
-
CPU Architecture: x86_64
-
Memory: 16GB
-
Storage: 50GB
-
Port: 443
The recommended minimum 50 GB of storage is shared across the Kubernetes cluster (i.e. hosts). All pods and/or services use this storage for mounted volumes and other utilities, including image storage.
In a single node cluster, if shared volumes are not externalized, the host requires the full 50 GB of storage. If the persistent volume is mounted externally, the host requires 37 GB of storage, since the default storage required by the database (10 GB), gateway (1 GB), masking (1 GB) and virtualization-app (1 GB) draws from the external storage. The default storage configuration for the database, gateway, masking, and virtualization-app can be modified in the values.yaml file.
Many users may have default container settings as part of their Kubernetes or OpenShift infrastructure management. It is paramount to compare those default settings with the recommended minimum performance specifications (please engage your container infrastructure team to verify). If those default setting are lower, please update them to the minimum or higher.
A sample configuration is provided below for reference. This can be used as a starting point when defining pod resource requests and limits in your deployment.
dataBookmarks:
  resources:
    requests:
      memory: "256Mi"
      cpu: "100m"
    limits:
      memory: "512Mi"
      cpu: "300m"
dataLibrary:
  resources:
    requests:
      memory: "256Mi"
      cpu: "100m"
    limits:
      memory: "1024Mi"
      cpu: "800m"
database:
  resources:
    requests:
      memory: "256Mi"
      cpu: "200m"
    limits:
      memory: "4096Mi"
      cpu: "1100m"
gateway:
  resources:
    requests:
      memory: "512Mi"
      cpu: "400m"
    limits:
      memory: "2048Mi"
      cpu: "400m"
graphql:
  resources:
    requests:
      memory: "256Mi"
      cpu: "100m"
    limits:
      memory: "1024Mi"
      cpu: "200m"
ui:
  resources:
    requests:
      memory: "128Mi"
      cpu: "100m"
    limits:
      memory: "256Mi"
      cpu: "200m"
jobs:
  resources:
    requests:
      memory: "256Mi"
      cpu: "200m"
    limits:
      memory: "1024Mi"
      cpu: "400m"
jobsCleaner:
  resources:
    requests:
      memory: "256Mi"
      cpu: "200m"
    limits:
      memory: "512Mi"
      cpu: "400m"
masking:
  resources:
    requests:
      memory: "512Mi"
      cpu: "500m"
    limits:
      memory: "2304Mi"
      cpu: "700m"
virtualizationApp:
  resources:
    requests:
      memory: "512Mi"
      cpu: "600m"
    limits:
      memory: "2560Mi"
      cpu: "700m"
virtualization:
  resources:
    requests:
      memory: "256Mi"
      cpu: "100m"
    limits:
      memory: "512Mi"
      cpu: "300m"
Installation requirements (OpenShift)
DCT is designed to run and is supported on any Certified Kubernetes platform that supports Helm. See the full statement in the Getting started page.
DCT requires a running OpenShift cluster to run, oc command line tool to interact with OpenShift cluster, and HELM for deployment onto the cluster.
|
Requirement |
DCT Recommended Version |
Comments |
|---|---|---|
|
OpenShift Cluster |
4.12 or above |
|
|
HELM |
3.9.0 or above |
HELM installation should support HELM v3. More information on HELM can be found at https://helm.sh/docs/. To install HELM, follow the installation instructions at https://helm.sh/docs/intro/install/. |
|
oc |
4.11.3 or above |
To install |
If an intermediate HELM repository is to be used instead of the default Delphix HELM repository, then the repository URL, username, and password to access this repository needs to be configured in the values.yaml file under imageCredentials section.
Installation process
Jump box setup
Run the OC login command to authenticate OpenShift CLI with the server:
oc login https://openshift1.example.com --token=<<token>>HELM will use the configuration file inside the $HOME/.kube/ folder to deploy artifacts on an OpenShift cluster.
Be sure the config file has the cluster context added, and the current-context is set to use this cluster. To verify the context, run this command:
oc config current-contextCreate a new project named dct-services using the command below:
oc new-project dct-services --description="DCT Deployment project" --display-name="dct-services"Install HELM using the following installation instructions mentioned at https://helm.sh/docs/intro/install/.
Deploy DCT chart
Add the DCT HELM repo with the following, which will link the DCT HELM repo to the local HELM repo:
helm repo add dct-services https://dlpx-helm-dct.s3.amazonaws.com Update the added repos with the following, which will update the local HELM charts metadata (index.yaml):
helm repo updatePull the HELM charts with the following, which is used to download the .tgz file:
helm pull dct-services/delphix-dct --version x.0.0The downloaded file is then extracted using the following command (where x.0.0 should be changed to the version of DCT being installed):
tar -xvf delphix-dct-x.0.0.tgzUpdate the following properties in the values.yaml file, present in the extracted delphix-dct folder.
-
To generate the bootstrap APIKey, set
apiKeyCreate: true. -
Provide image credentials to pull images from docker registry.
-
username: <retrieved from download.delphix.com> -
password: <retrieved from download.delphix.com>
-
-
isOpenshiftshould be set totrue.
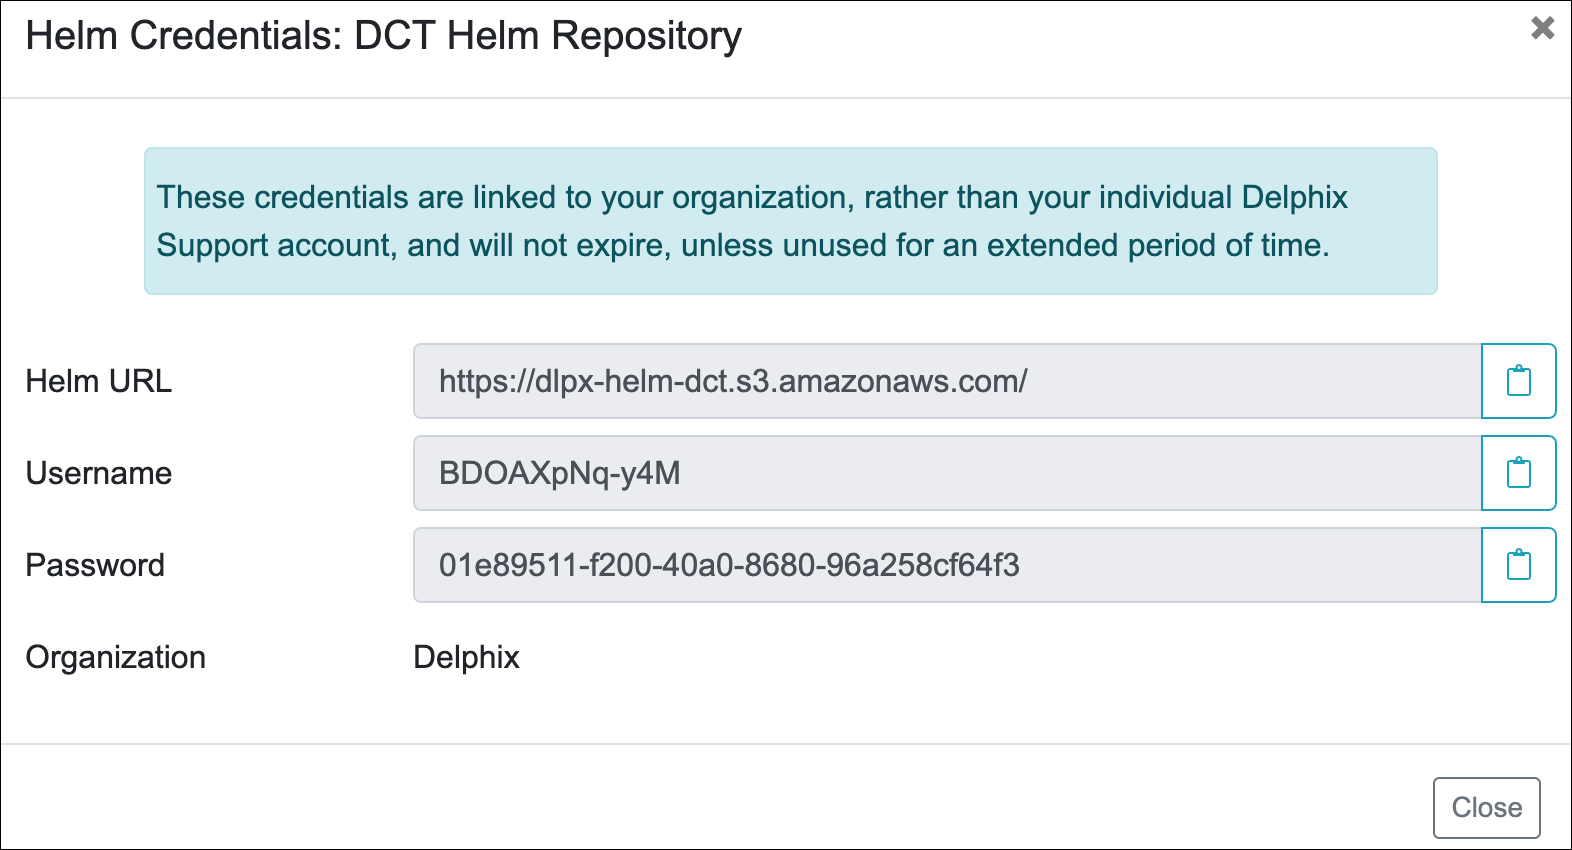
To get the image credentials, visit the Delphix DCT Download page and login with your user login credentials. Once logged in, select the DCT Helm Repository link and accept the Terms and Conditions. Use password from the popup screen, as shown below.
Find and update fsGroup in values.yaml file
The fsGroup field is used to specify a supplementary group ID. All processes of the container, the owner of the volume, and any files created on the volume are also part of this supplementary group ID. For OpenShift deployment, this value need to be specified in the values.yaml file.
Find the allowed supplementary group range:
oc get project dct-services -o yamlA response should appear as follows:
apiVersion: project.openshift.io/v1
kind: Project
metadata:
  annotations:
    openshift.io/description: ""    openshift.io/display-name: ""    openshift.io/requester: cluster-admin
    openshift.io/sa.scc.mcs: s0:c32,c4
    openshift.io/sa.scc.supplemental-groups: 1001000000/10000
    openshift.io/sa.scc.uid-range: 1001000000/10000
  creationTimestamp: "2023-01-18T10:33:04Z"  labels:
    kubernetes.io/metadata.name: dct-services
    pod-security.kubernetes.io/audit: restricted
    pod-security.kubernetes.io/audit-version: v1.24
    pod-security.kubernetes.io/warn: restricted
    pod-security.kubernetes.io/warn-version: v1.24
  name: dct-services
  resourceVersion: "99974"  uid: ccdd5c9f-2ce5-49b4-91a7-662e0598b63b
spec:
  finalizers:
  - kubernetes
status:
  phase: Active
Copy the first value from the openshift.io/sa.scc.supplemental-groups line, before the slash (e.g. 1001000000). Paste this value in the values.yaml file, for example:
# Define SecurityContextConstraints for the pod
podSecurityContext:
 fsGroup: 1001000000
Deploy DCT
Run the following command to deploy the DCT chart (where x.0.0 should be changed to the version of DCT being installed):
helm install dct-services delphix-dctdelphix-dct is the name of the folder which was extracted in the previous step. dct-services is the chart name which is given for this deployment.
In the above directory structure, the values.yaml file contains the properties which are configured above. Deploy DCT using following command to use the custom values.yaml:
helm install dct-services -f <path to edited values.yaml> <directory path of the extracted chart>Verify deployment
All the images will be downloaded and then deployed. If some pods restarted at the startup, this is expected. After some time, a total of 9 pods will be in running status and one job pod will be in completed status.
oc get pods -n dct-servicesGet the API key
For the very first deployment the bootstrap API key will be printed in logs, please view gateway pod logs and find for “NEWLY GENERATED API KEY”. the value is the API key.
oc logs <gateway-pod-name> -n dct-servicesConfigure Ingress
DCT only works with HTTPS Ingress, the UI does not support HTTP.
Creating a route
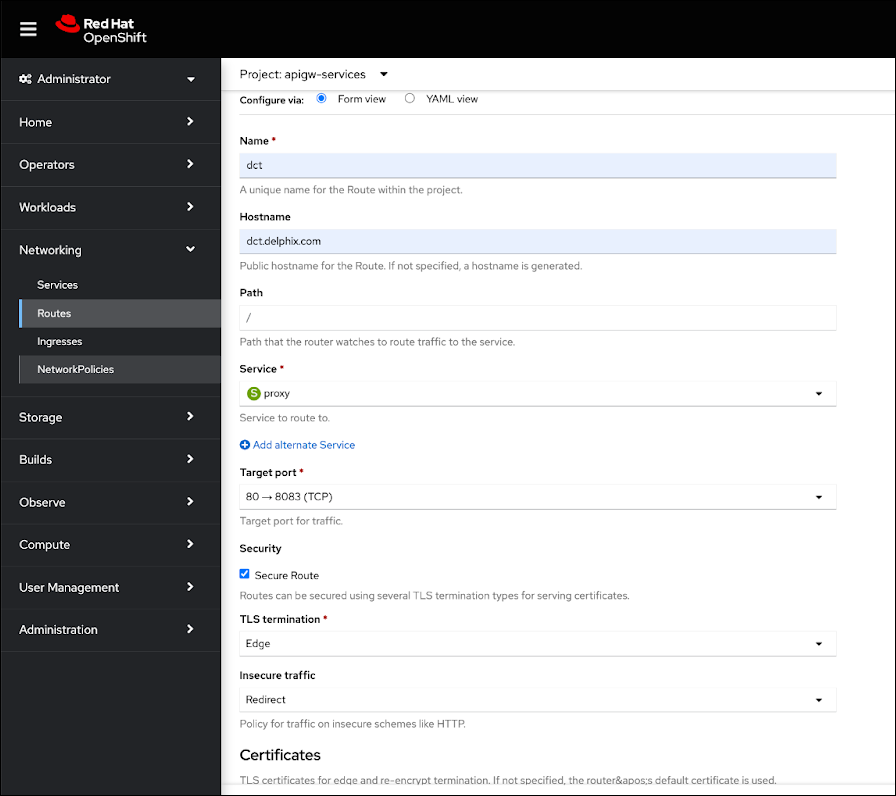
To create a route, you can use the OpenShift console and create a new one for the DCT service.
If SSL is terminated at this route, only then should the useSSL value in values.yaml be updated to false, so that 80 port will be exposed in proxy service and can be used to configure the route. The following screenshot shows the route that forwards requests to 80 port of proxy service:
If SSL is not terminated at the Route level, then create a PassTrough route and use 443 port of the proxy service, and configure the SSL certificate and key in the values.yaml file:
Offline mode installation
Offline mode is supported for use cases where:
-
The cluster is air-gapped and does not have access to the Delphix Docker registry.
-
Delphix Docker images must be pushed to the organization’s internal Artifactory or registry for scanning or to comply with internal security policies.
If either of these cases applies, retrieve the Delphix Docker images, Helm chart, and deploy using a jump box machine. The jump box must have access to both the Delphix Docker registry (or download site) and the organization’s internal Artifactory or registry, and it must meet the installation requirements.
-
Get the Docker images
There are two ways to retrieve the Delphix Docker images; either pull the images from the Delphix Docker registry or download and load the images from a tarball.
-
Pulling images from the Docker registry
-
Login to the jump box machine.
-
Pull the Docker images from the Delphix Docker registry:
Copydct.download.delphix.com/delphix-dct:app-x.0.0
dct.download.delphix.com/delphix-dct:jobs-x.0.0
dct.download.delphix.com/delphix-dct:nginx-x.0.0
dct.download.delphix.com/delphix-dct:postgres-x.0.0
dct.download.delphix.com/delphix-dct:graphql-x.0.0
dct.download.delphix.com/delphix-dct:ui-x.0.0
dct.download.delphix.com/delphix-dct:virtualization-app-x.0.0
dct.download.delphix.com/delphix-dct:delphix-data-library-x.0.0
dct.download.delphix.com/delphix-dct:data-bookmarks:x.0.0
dct.download.delphix.com/delphix-dct:masking-x.0.0
dct.download.delphix.com/delphix-dct:ai-control-x.0.0
dct.download.delphix.com/delphix-dct:ai-execution:x.0.0 -
Re-tag all Docker images. The example below shows the re-tag command for one image:
Copy$ docker tag dct.download.delphix.com/delphix-dct:nginx-x.0.0 <local registry url>:nginx-x.0.0Re-tag all remaining DCT images using the same format.
-
Push the re-tagged images into the internal registry. The example below shows the push command for one image:
Copy$ docker push <local registry url>:nginx-x.0.0
-
-
Downloading tarball images
-
If you do not have direct access to the Delphix Helm and Docker repositories, download the Helm chart and Docker image packages (delphix-dct-x.0.0.tar.gz) from the download site.
-
Log in to the jump box machine.
-
Download the delphix-dct-x.0.0.tar.gz file, then extract it to obtain the Helm chart and Docker images.
-
Load the extracted Docker images using the following command:
Copyfor image in *tar; do sudo docker load --input $image; done -
Re-tag all Docker images. The example below shows the re-tag command for one image:
Copy$ docker tag registry.delphix.com/delphix-dct:nginx-x.0.0 <local registry url>:nginx-x.0.0Re-tag all remaining DCT images using the same format.
-
Push the re-tagged images into the internal registry. The example below shows the push command for one image:
Copy$ docker push <local registry url>:nginx-x.0.0
-
-
-
Deploy
Update the values.yaml file with your internal registry details and image credentials:
CopyRegistry: <local registry url>
Username: <local registry username>
Password: <local registry password>Install DCT by following the instructions in the Find and update fsGroup in values.yaml file section above.