Quick start guide for SQL Server (Microsoft SQL Server on Windows)
This quick start guide, which is excerpted from the larger User Guide, is intended to provide you with a quick overview of working with SQL Server database objects in the Delphix Engine. It does not cover any advanced configuration options or best practices, which can have a significant impact on performance. It assumes that you are working in a Lab/Dev setting and attempting to quickly test Delphix functionality. It assumes you will use the VMware Hypervisor. It assumes you are running supported combinations of software as explained here: Supported OS, SQL Server, and Backup Software Versions for SQL Server.
Overview
In this guide, we will walk through deploying a Delphix Engine, starting with configuring Source, Staging, and Target database environments on Windows servers. We will then create a dSource, and provision a VDB.
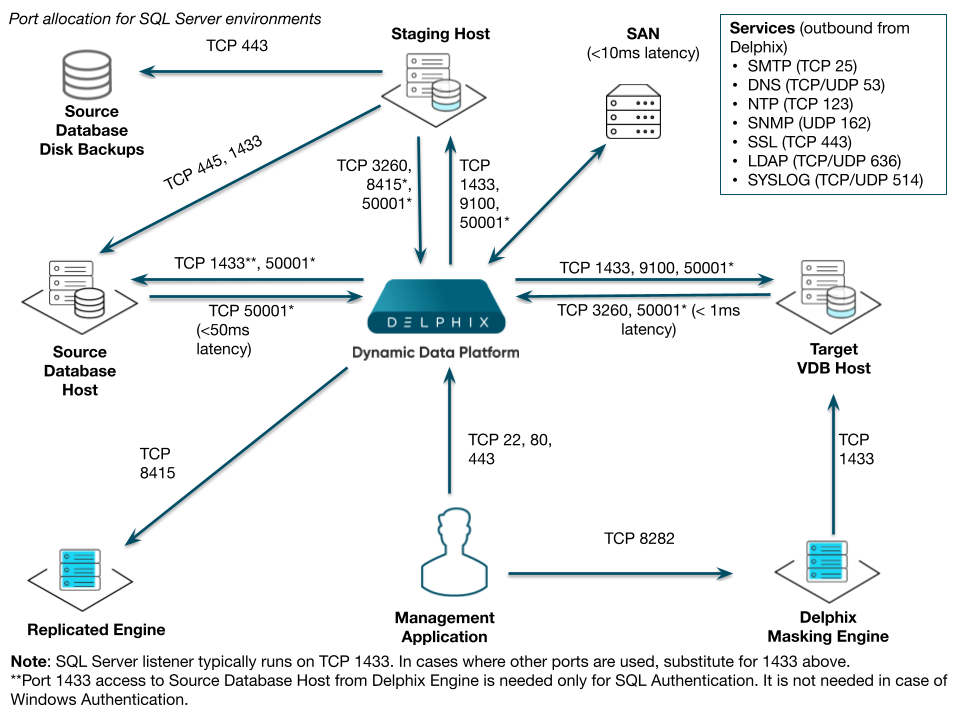
The following diagram describes the engine topology for SQL Server environments. It illustrates the recommended ports to be open from the engine to remote services, to the Delphix Engine, and to the Source, Target and Validated Sync Environments.
For purposes of the QuickStart, you can ignore any references to Replication or Masking, such as the engines shown in the diagram below.
Deploy OVA on VMware
Use the Delphix-supplied OVA file to install the Delphix Engine. The OVA file is configured with many of the minimum system requirements. The underlying storage for the install is assumed to be redundant SAN storage.
-
Download the OVA file from https://download.delphix.com. You will need a support login from your sales team or a welcome letter.
-
Navigate to the Delphix Product Releases
-
-
Login using the vSphere client to the vSphere server (or vCenter Server) where you want to install the Delphix Engine.
-
In the vSphere Client, click File.
-
Select Deploy OVA Template.
-
Browse to the OVA file.
-
Click Next.
-
Select a hostname for the Delphix Engine. This hostname will also be used in configuring the Delphix Engine network.
-
Select the data center where the Delphix Engine will be located.
-
Select the cluster and the ESX host.
-
Select one (1) data store for the Delphix OS. This datastore can be thin-provisioned and must have enough free space to accommodate the 127GB comprising the Delphix operating system.
-
Select four (4) or more data stores for Database Storage for the Delphix Engine. The Delphix Engine will stripe all of the Database Storage across these VMDKs, so for optimal I/O performance, each VMDK must be equal in size and be configured Thick Provisioned - Eager Zeroed. Additionally, these VMDKs should be distributed as evenly as possible across all four SCSI I/O controllers.
-
Select the virtual network you want to use.
If using multiple physical NICs for link aggregation, you must use vSphere NIC teaming. Do not add multiple virtual NICs to the Delphix Engine itself. The Delphix Engine should use a single virtual network. For more information, see Optimal Network Architecture for the Delphix Engine. -
Click Finish. The installation will begin and the Delphix Engine will be created in the location you specified.
-
Once the installation has been completed, power on the Delphix Engine and proceed with the initial system configuration as described in Setting Up Network Access to the Delphix Engine.
Setup network access to Delphix engine
-
Power on the Delphix Engine and open the Console.
-
Wait for the Delphix Management Service and Delphix Boot Service to come online. This might take up to 10 minutes during the first boot. Wait for the large orange box to turn green.
-
Press any key to access the sysadmin console.
-
Enter
sysadmin@SYSTEMfor the username andsysadminfor the password. -
You will be presented with a description of available network settings and instructions for editing.
CopyDelphix Engine Network Setup
To access the system setup through the browser, the system must first be configured for networking in your
environment. From here, you can configure the primary interface, DNS, hostname, and default route. When DHCP is
configured, all other properties are derived from DHCP settings.
To see the current settings, run "get." To change a property, run "set <property>=<value>." To commit your changes,
run "commit." To exit this setup and return to the standard CLI, run "discard."
defaultRoute IP address of the gateway for the default route -- for example, "1.2.3.4."
dhcp Boolean value indicating whether DHCP should be used for the primary interface. Setting this value
to "true" will cause all other properties (address, hostname, and DNS) to be derived from the DHCP
response
dnsDomain DNS Domain -- for example, "delphix.com"
dnsServers DNS server(s) as a list of IP addresses -- for example, "1.2.3.4,5.6.7.8."
hostname Canonical system hostname, used in alert and other logs -- for example, "myserver"
primaryAddress Static address for the primary interface in CIDR notation -- for example, "1.2.3.4/22"
Current settings:
defaultRoute: 192.168.1.1
dhcp: false
dnsDomain: example.com
dnsServers: 192.168.1.1
hostname: Delphix
primaryAddress: 192.168.1.100/24 -
Configure the
hostname. Use the samehostnameyou entered during the server installation. If you are using DHCP, you can skip this step.Copydelphix network setup update *> set hostname=<hostname> -
Configure DNS. If you are using DHCP, you can skip this step.
Copydelphix network setup update *> set dnsDomain=<domain>delphix network setup update *> set dnsServers=<server1-ip>[,<server2-ip>,...] -
Configure either a static or DHCP address. The static IP address must be specified in CIDR notation (for example,
192.168.1.2/24) -
Configure a default gateway. If you are using DHCP, you can skip this step.
Copydelphix network setup update *> set defaultRoute=<gateway-ip> -
Commit your changes. Note that you can use the
getcommand prior to committing to verify your desired configuration.Copydelphix network setup update *> commit
Successfully committed network settings. Further setup can be done through the browser at:
http://<address>Type "exit" to disconnect, or any other commands to continue using the CLI. -
Check that you can now access the Delphix Engine through a Web browser by navigating to the displayed IP address, or hostname if using DNS.
-
Exit setup.
Copydelphix> exit
Setting up the Delphix engine
Once you set up the network access for Delphix Engine, navigate to the Delphix Engine URL in your browser for server setup.
The welcome screen below will appear for you to begin your Delphix Engine setup.
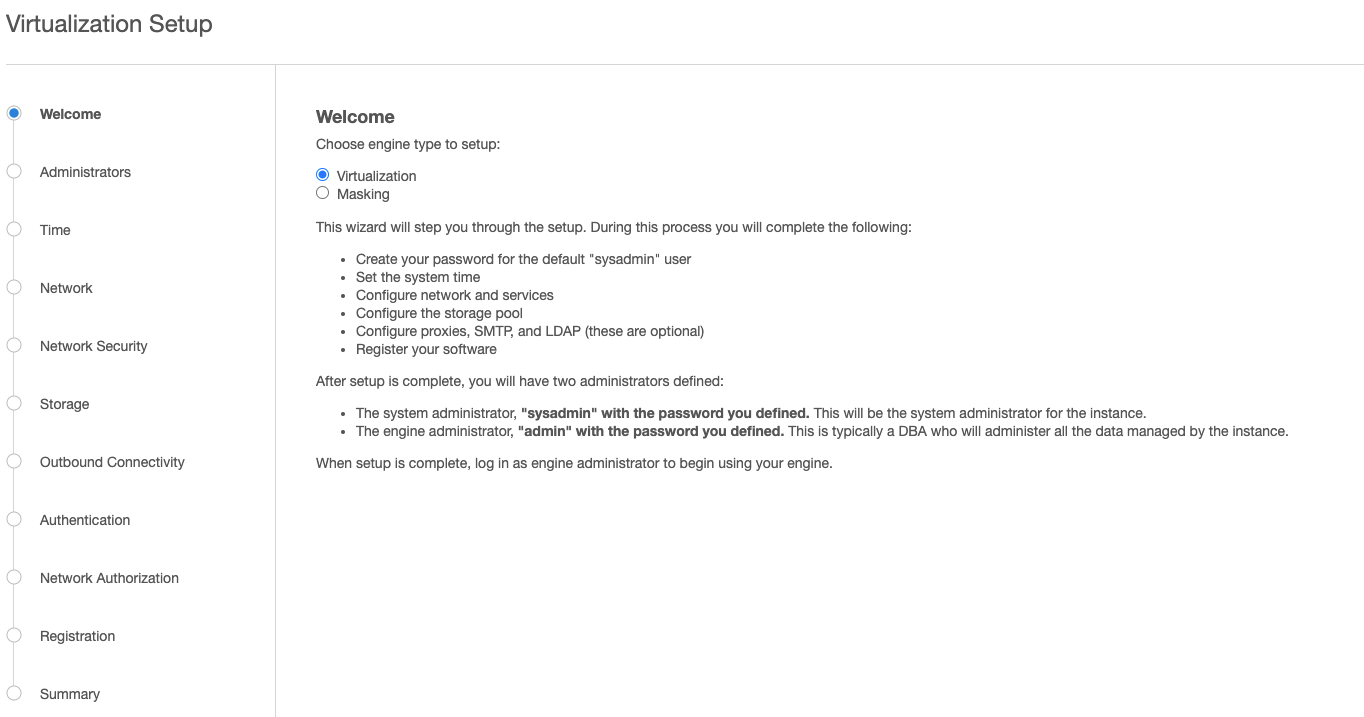
The setup procedure uses a wizard process to take you through a set of configuration screens:
-
Administrators
-
Time
-
Network
-
Network Security
-
Storage
-
Outbound Connectivity
-
Authentication
-
Network Authorization
-
Registration
-
Summary
-
Connect to the Delphix Engine at
http:///login/index.html#serverSetup.
The Delphix Setup application will launch when you connect to the server.
Enter your sysadmin login credentials, which initially defaults to the username sysadmin, with the initial default password of sysadmin. On first login, you will be prompted to change the initial default password. -
Click Next.
Administrators
The Delphix Engine supports two types of administrators:
-
System Administrator (sysadmin) - this is the engine system administrator. The sysadmin password is defined here.
-
Engine Administrator (admin) - this is typically a DBA who will administer all the data managed by the engine.
On the Administrators tab, you set up the sysadmin password by entering an email address and password. The details for the admin are displayed for reference.
System time
The engine time is used as the baseline for setting policies that coordinate between virtual databases and external applications.
Choose your option to set up system time in this section. For a Quick Start, simply set the time and your timezone. You can change this later.
Network
The initial out-of-the-box network configuration in the OVA file is set to use a single VMXNET3 network adapter.
You have already configured this in the initial configuration. Delphix supports more advanced configurations, but you can enable those later.
Storage
You should see the data storage VMDKs or RDMs you created during the OVA installation. Click Next to configure these for data storage.
Serviceability
Choose your options to configure serviceability settings.
For a Quick Start, accept the defaults. You can change this later.
Authentication
Choose your options to configure authentication services.
For a Quick Start, accept the defaults. You can change this later.
Registration
If the Delphix Engine has access to the external Internet (either directly or through a web proxy), then you can auto-register the Delphix Engine:
-
Enter your Support Username and Support Password.
-
Click Register.
If external connectivity is not immediately available, you must perform manual registration.
-
Copy the Delphix Engine registration code in one of two ways:
-
Manually highlight the registration code and copy it to clipboard. Or,
-
Click Copy Registration Code to Clipboard.
-
-
Transfer the Delphix Engine's registration code to a workstation with access to the external network Internet. For example, you could e-mail the registration code to an externally accessible e-mail account.
-
On a machine with access to the external Internet, please use your browser to navigate to the Delphix Registration Portal at http://register.delphix.com.
-
Login with your Delphix support credentials (username and password).
-
Paste the Registration Code.
-
Click Register.
To regenerate the registration code for a Delphix Engine please refer to,Regenerating the Delphix Engine Registration Code. Delphix strongly recommends that you regenerate this code and re-register the engine regularly to maximize the Support Security of the Delphix Engine. Delphix recommends doing this every six months.
Summary
The final summary tab will enable you to review your configurations for System Time, Network, Storage, Serviceability, and Authentication.
-
Click the Back button to go back and to change the configuration for any of these server settings.
-
If you are ready to proceed, then click Submit.
-
Click Yes to confirm that you want to save the configuration.
-
Click Setup to acknowledge the successful configuration.
-
There will be a wait of several minutes as the Delphix Engine completes the configuration.
Add the SQL server source environment
Delphix does not require running the Connector on your source. Instead, you'll use the Validated Sync environment as a connector environment to discover the source by proxy.
-
Log in to the Delphix Management application.
-
Click Manage.
-
Select Environments.
-
Next to Environments, click the Actions menu, and select Add Environment.
-
In the Add Environmentwizard, Host and Server tab select:
-
Host OS: Windows
-
Host Type: Source
-
Server Type:
-
If you are adding a Windows Server Failover Cluster (WSFC), add the environment based on which WSFC feature the source databases use:
-
Failover Cluster Instances Add the environment as a standalone source using the cluster name or address.
-
AlwaysOn Availability Groups Add the environment as a cluster source using the cluster name or address.
-
-
Otherwise, add the environment as a standalone source.
-
-
Click Next.
-
In the Environment Settings tab select a Connector Environment. Connector environments are used as a proxy for running discovery on the source. If no connector environments are available for selection, you will need to set them up as described in Adding a SQL Server Standalone Target Environment. Connector environments must:
-
have the Delphix Connector installed
-
be registered with the Delphix Engine from the host machine where they are located.
-
-
Enter the Environment Name, Node Address, OSUsername, and OSPassword for the source environment.
-
Click Submit.
As the new environment is added, you will see multiple jobs running in the Delphix Admin Job History to Create and Discover an environment. In addition, if you are adding a cluster environment, you will see jobs to Create and Discover each node in the cluster and their corresponding hosts. When the jobs are complete, you will see the new environment added to the list in the Environments panel. If you don't see it, click the Actions menu and select Refresh All.
Linking a SQL server data source (dSource)
Linking a dSource will ingest data from the source and create a dSource object on the engine. The dSource is an object that the Delphix Virtualization Engine uses to create and update virtual copies of your database. As a virtualized representation of your source data, it cannot be managed, manipulated, or examined by database tools.
For an overview of all dSource related actions, refer to Managing Data Sources and Syncing Data.
For details about enabling auto expansion of mount volumes, refer to Enabling auto expansion of SQL Server mount volumes.
When linking a dSource from a SQL Server source database, Delphix offers several different methods of capturing backup information:
-
SQL Server Managed Backups, where the SQL Server source database schedules and initiates backups and the Delphix Engine captures them
-
Full backups
-
Full or differential backups
-
Transaction log backups (with LogSync disabled)
-
Transaction log backups (with LogSync enabled)
-
-
Delphix Managed Backups, where the Delphix Engine schedules and initiates the backups from the source database, and captures them
Procedure
-
Log in to the Delphix Management application.
-
Navigate to Manage > Datasets.
-
Click the plus icon and select Add dSource.
-
In the Add dSource wizard, select the source database with the correct environment user-specified.
-
Select user type for source database authentication and enter the login credentials. Enter username and password for Database user or Domain (Windows) user. For Environment User, select a source environment user from the dropdown list and click Next.
-
Enter a name and select a group for your dSource. Adding a dSource to a dataset group lets you set Delphix Domain user permissions for that database and its objects, such as snapshots. See the topics under Users and Groups for more information.
-
Select the Data Management settings needed. For more information, Data Management Settings for SQL Server Data Sources.
-
Select the Staging environment and SQL Instance that will be used to manage the staging database used for validated sync of the dSource.
-
Select any policies for the new dSource.
-
Enter any scripts that should be run on the Hooks page.
-
Review the dSource Configuration and Data Management information, and then click Submit.
Provisioning a SQL server virtual database (VDB)
For details about enabling auto expansion of mount volumes, refer to Enabling auto expansion of SQL Server mount volumes.
-
Log in to the Delphix Management application.
-
Select Manage > Datasets.
-
Select a dSource.
-
Click Timeflow tab.
-
Next to a snapshot select the
 Provision VDB icon. The Provision VDB panel will open, and the Database Name and Recovery Model will auto-populate with information from the dSource.
 -
Select a target environment.
-
Select an Instance to use.
-
If the selected target environment is a Windows Failover Cluster environment, select a drive letter from Available Drives. This drive will contain volume mount points to Delphix storage.
Windows Cluster Volume Management Software RequirementsOnly cluster volumes managed by the native Windows Volume Manager are supported. For example, cluster volumes managed by Veritas VxVM are not supported.
If you use third-party volume management software, create a new LU (recommended to be 10GB in size) and add this LU as a clustered resource to the SQL Server instance using native Windows volume management tools. Assign a drive letter for this LU. You can then use this LU as the volume mount point location for Delphix VDB provisioning
-
Enter a VDB Name and select a Target Group for the VDB.
-
Enable Auto VDB Restart to allow the Delphix Engine to automatically restart the VDB when it detects target host reboot.
-
Click Next.
-
Select a Snapshot Policy for the VDB. Click Next.
-
Specify any Pre- or Post-Scripts that should be used during the provisioning process.
-
Click Next.
-
The final summary tab will enable you to review your configurations.
-
Click Submit.
When provisioning starts, the VDB will appear in the Datasets panel. Select the VDB and navigate to the Status tab to see the progress of the job. When provisioning is complete, you can see more information on the Configuration tab.
Provisioning by snapshot or logSync
When provisioning by snapshot, you can provision to the start of any particular snapshot, either by time or LSN.
|
Provisioning By Snapshot |
Description |
|---|---|
|
Provision by Time |
You can provision to the start of any snapshot by selecting that snapshot card from the TimeFlow tab, or by selecting the time icon and entering a value in the time entry fields. The values you enter will snap to the beginning of the nearest snapshot. |
|
Provision by LSN |
You can use Provision by LSN control to open the LSN entry field. Here, you can type or paste in the LSN to which you want to provision. After entering a value, it will "snap" to the start of the closest appropriate snapshot. Provisioning a SQL Server VDB Procedure |
Next steps
Congratulations! You have provisioned your first virtual database!
Now, perform some simple functional tests with your application. You can connect your app to the VDB using standard TNS/JDBC techniques. Delphix has already registered the VDB for you on the target listener.
We suggest the following next steps:
-
Drop a table and use the VDB Rewind feature to test the recovery of your VDB.
-
Take a snapshot of your dSource and refresh your VDB to quickly get fresh production data.
-
Provision a new VDB from your VDB to test sharing data quickly with other teams.
-
Mask your new VDB to protect sensitive data. Provision new VDBs from that masked VDB to quickly provide safe data to the development and QA teams.